سطح برنامه
تعریف یک سبک در سطح برنامه میتواند در کل برنامه کاربردی قابل دسترسی باشد. بیایید همان مثال را بیاوریم، اما در اینجا، ما در فایل app.xaml سبک ها را قرار می دهیم تا آن را در برنامه در دسترس قرار دهیم
محرک ها برای تغییر ارزش هر یک از ویژگی های داده شده مورد استفاده قرار می گیرند، زمانی که شرایط خاصی راضی باشند. گیرنده ها معمولا در قالب یا در ریشه سند تعریف می شوند که به آن کنترل خاص اعمال می شود. سه نوع محرک وجود دارد -
زمینه و قالب ها
راه اندازی داده ها
راه اندازی رویداد
در رویدادهای قالب، زمانی که یک تغییر در یک قالب رخ می دهد، تغییری فوری یا متحرک در یک قالب دیگر به ارمغان می آورد. برای مثال، می توانید از یک ماژول برای تغییر ظاهر یک دکمه زمانی که ماوس روی دکمه قرار دارد استفاده کنید.
کد زیر در زیر نشان می دهد که چگونه رنگ پیش زمینه یک دکمه را هنگامی که ماوس روی دکمه قرار دارد، تغییر دهید
<Window x:Class = "WPFPropertyTriggers.MainWindow"
   xmlns = "http://schemas.microsoft.com/winfx/2006/xaml/presentation"
   xmlns:x = "http://schemas.microsoft.com/winfx/2006/xaml"
   Title = "MainWindow" Height = "350" Width = "604">

   <Window.Resources>
      <Style x:Key = "TriggerStyle" TargetType = "Button">
         <Setter Property = "Foreground" Value = "Blue" />
         <Style.Triggers>
            <Trigger Property = "IsMouseOver" Value = "True">
               <Setter Property = "Foreground" Value = "Green" />
            </Trigger>
         </Style.Triggers>
      </Style>
   </Window.Resources>

   <Grid>
      <Button Width = "100" Height = "70"
         Style = "{StaticResource TriggerStyle}" Content = "Trigger"/>
   </Grid>

</Window>
وقتی کد بالا را کامپایل میکنید و اجرا میکنید، پنجره زیر را تولید میکند

هنگامی که ماوس روی دکمه قرار می گیرد، رنگ پیش زمینه آن به سبز تبدیل می شود
راه اندازی داده ها
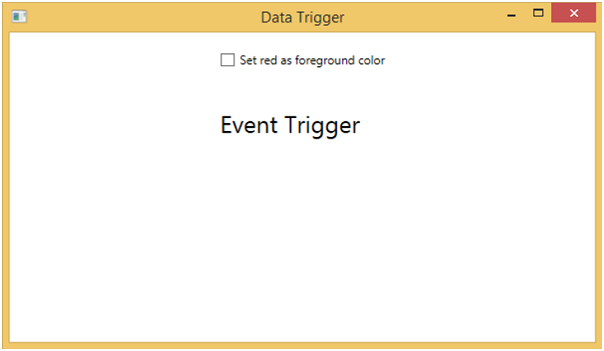
یک ماژول داده برخی از اقدامات را انجام می دهد زمانی که داده های محدود به برخی از شرایط رضایت می دهد. بیایید به کد زیر XAML نگاه کنیم که در آن یک چک باکس و یک بلوک متن با برخی از خواص ایجاد شده است. وقتی علامت کادر را انتخاب می کنید، رنگ پیش زمینه آن را به رنگ قرمز تغییر می دهد
<Window x:Class = "WPFDataTrigger.MainWindow"
   xmlns = "http://schemas.microsoft.com/winfx/2006/xaml/presentation"
   xmlns:x = "http://schemas.microsoft.com/winfx/2006/xaml"
   Title = "Data Trigger" Height = "350" Width = "604">

   <StackPanel HorizontalAlignment = "Center">
      <CheckBox x:Name = "redColorCheckBox"
         Content = "Set red as foreground color" Margin = "20"/>

      <TextBlock Name = "txtblock" VerticalAlignment = "Center"
         Text = "Event Trigger" FontSize = "24" Margin = "20">
         <TextBlock.Style>
            <Style>
               <Style.Triggers>
                  <DataTrigger Binding = "{Binding ElementName = redColorCheckBox, Path = IsChecked}"
                     Value = "true">
                     <Setter Property = "TextBlock.Foreground" Value = "Red"/>
                     <Setter Property = "TextBlock.Cursor" Value = "Hand" />
                  </DataTrigger>
               </Style.Triggers>
            </Style>
         </TextBlock.Style>
      </TextBlock>

   </StackPanel>

</Window>
هنگامی که کد بالا کامپایل شده و اجرا می شود، خروجی زیر را تولید می کند –
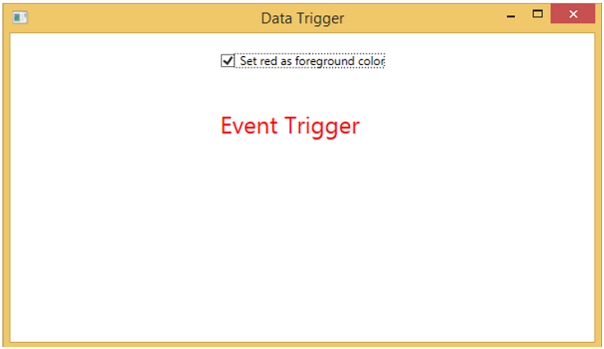
وقتی علامت کادر را علامت بزنید، بلوک متن رنگ پیش زمینه خود را به رنگ قرمز تغییر می دهد.
راه اندازی رویداد
یک رویداد رویداد یک رویداد خاص را اخراج می کند. این معمولا برای انجام برخی از انیمیشن ها در کنترل مانند DoubleAnumatio، ColorAnimation و غیره استفاده می شود. در مثال زیر ما یک دکمه ساده ایجاد می کنیم. هنگامی که رویداد کلیک اخراج می شود، عرض و ارتفاع دکمه را گسترش می دهد
<Window x:Class = "WPFEventTrigger.MainWindow"
   xmlns = "http://schemas.microsoft.com/winfx/2006/xaml/presentation"
   xmlns:x = "http://schemas.microsoft.com/winfx/2006/xaml"
   Title = "MainWindow" Height = "350" Width = "604">

   <Grid>
      <Button Content = "Click Me" Width = "60" Height = "30">

         <Button.Triggers>
            <EventTrigger RoutedEvent = "Button.Click">
               <EventTrigger.Actions>
                  <BeginStoryboard>
                     <Storyboard>

                        <DoubleAnimationUsingKeyFrames Storyboard.TargetProperty =
                           "Width" Duration = "0:0:4">
                           <LinearDoubleKeyFrame Value = "60" KeyTime = "0:0:0"/>
                           <LinearDoubleKeyFrame Value = "120" KeyTime = "0:0:1"/>
                           <LinearDoubleKeyFrame Value = "200" KeyTime = "0:0:2"/>
                           <LinearDoubleKeyFrame Value = "300" KeyTime = "0:0:3"/>
                        </DoubleAnimationUsingKeyFrames>

                        <DoubleAnimationUsingKeyFrames Storyboard.TargetProperty = "Height"
                           Duration = "0:0:4">
                           <LinearDoubleKeyFrame Value = "30" KeyTime = "0:0:0"/>
                           <LinearDoubleKeyFrame Value = "40" KeyTime = "0:0:1"/>
                           <LinearDoubleKeyFrame Value = "80" KeyTime = "0:0:2"/>
                           <LinearDoubleKeyFrame Value = "150" KeyTime = "0:0:3"/>
                        </DoubleAnimationUsingKeyFrames>

                     </Storyboard>
                  </BeginStoryboard>
               </EventTrigger.Actions>
            </EventTrigger>
         </Button.Triggers>

      </Button>
   </Grid>

</Window>
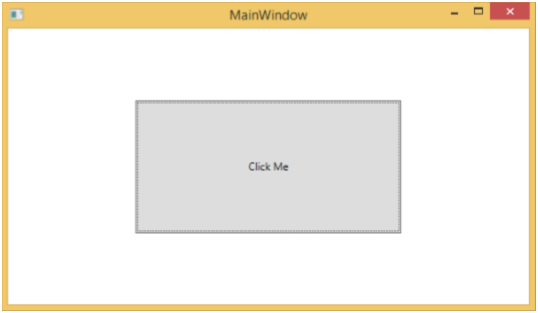
وقتی کد بالا را کامپایل میکنید و اجرا میکنید، پنجره زیر را نمایش میدهد
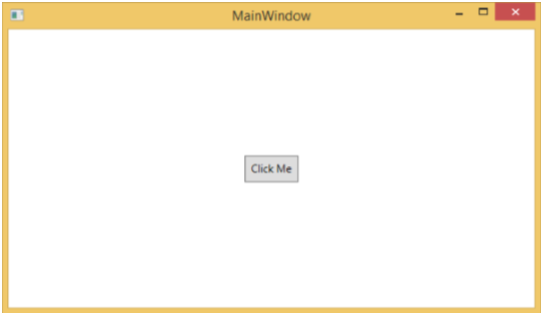
پس از کلیک بر روی دکمه، مشاهده خواهید کرد که در هر دو بعد گسترش خواهد یافت.
WPF یک طیف گسترده ای از گرافیک 2D را فراهم می کند که می تواند به عنوان مورد نیاز برنامه شما افزایش یابد. WPF از هر دو طراحی و شکل اشیاء که برای طراحی محتوای گرافیکی استفاده می شود پشتیبانی می کند.
اشکال و طراحی
کلاس شکل از کلاس ClassElement مشتق می شود، اشیاء Shape را می توان در داخل پانل ها و اکثر کنترل ها استفاده کرد.
WPF برخی اشیاء شبیه اولیه را که از کلاس شکل از قبیل الیپس، خط، مسیر، چند ضلعی، Polyline، و مستطیل ساخته شده است فراهم می کند.
از سوی دیگر، اشیاء نقاشی از کلاس ClassElement استخراج نمی شوند و اجرای پیوسته سبک تر را ارائه می دهند.
اشیاء رسم در مقایسه با اشیاء شکل ساده تر هستند. آنها ویژگی های عملکرد بهتر نیز دارند.
بیایید یک نمونه ساده برای درک نحوه استفاده از اشیاء مختلف اشکال بگیریم.
یک پروژه WPF جدید با نام WPF2DGraphics ایجاد کنید.
کد زیر انواع مختلفی از اشکال ایجاد می کند.
<Window x:Class = "WPF2DGraphics.MainWindow"
   xmlns = "http://schemas.microsoft.com/winfx/2006/xaml/presentation"
   xmlns:x = "http://schemas.microsoft.com/winfx/2006/xaml"
   xmlns:d = "http://schemas.microsoft.com/expression/blend/2008"
   xmlns:mc = "http://schemas.openxmlformats.org/markup-compatibility/2006"
   xmlns:local = "clr-namespace:WPF2DGraphics"
   xmlns:PresentationOptions = "http://schemas.microsoft.com/winfx/2006/xaml/present ation/options"
   mc:Ignorable = "PresentationOptions" Title = "MainWindow" Height = "400" Width = "604">

   <StackPanel>
      <Ellipse Width = "100" Height = "60" Name = "sample" Margin = "10">
         <Ellipse.Fill>
            <RadialGradientBrush>
               <GradientStop Offset = "0" Color = "AliceBlue"/>
               <GradientStop Offset = "1" Color = "Gray"/>
               <GradientStop Offset = "2" Color = "Red"/>
            </RadialGradientBrush>
         </Ellipse.Fill>
      </Ellipse>

      <Path Stroke = "Red" StrokeThickness = "5" Data = "M 10,70 L 200,70"
         Height = "42.085" Stretch = "Fill" Margin = "140.598,0,146.581,0" />
      <Path Stroke = "BlueViolet" StrokeThickness = "5" Data = "M 20,100 A 100,56 42 1 0 200,10"
         Height = "81.316" Stretch = "Fill" Margin = "236.325,0,211.396,0" />

      <Path Fill = "LightCoral" Margin = "201.424,0,236.325,0"
         Stretch = "Fill" Height = "124.929">
         <Path.Data>
            <PathGeometry>
               <PathFigure StartPoint = "50,0" IsClosed = "True">
                  <LineSegment Point = "100,50"/>
                  <LineSegment Point = "50,100"/>
                  <LineSegment Point = "0,50"/>
               </PathFigure>
            </PathGeometry>
         </Path.Data>
      </Path>

   </StackPanel>

</Window>
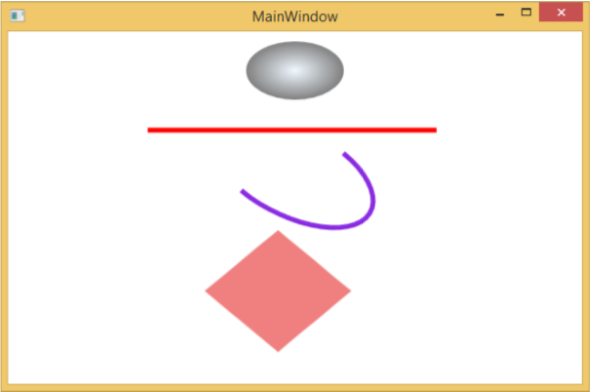
وقتی کد بالا را کامپایل میکنید و اجرا میکنید، یک بیضی، یک خط مستقیم، یک قوس و یک چند ضلعی تولید میکند.
مثال
بیایید به مثال دیگری نگاه کنیم که نشان می دهد چگونه یک نقاشی را با نقاشی نقاشی کنیم.
یک پروژه WPF جدید با نام WPF2DGraphics1 ایجاد کنید.
کد زیر XAML نشان می دهد چگونه با نقاشی تصویر متفاوت باشد.
<Window x:Class = "WPF2DGraphics1.MainWindow"
   xmlns = "http://schemas.microsoft.com/winfx/2006/xaml/presentation"
   xmlns:x = "http://schemas.microsoft.com/winfx/2006/xaml"
   xmlns:d = "http://schemas.microsoft.com/expression/blend/2008"
   xmlns:PresentationOptions = "http://schemas.microsoft.com/winfx/2006/xaml/present ation/options"
   xmlns:mc = "http://schemas.openxmlformats.org/markup-compatibility/2006"
   mc:Ignorable = "PresentationOptions"
   xmlns:local = "clr-namespace:WPF2DGraphics1" Title = "MainWindow" Height = "350" Width = "604">

   <Grid>
      <Border BorderBrush = "Gray" BorderThickness = "1"
         HorizontalAlignment = "Left" VerticalAlignment = "Top"
         Margin = "20">

         <Image Stretch = "None">
            <Image.Source>
               <DrawingImage PresentationOptions:Freeze = "True">

                  <DrawingImage.Drawing>
                     <DrawingGroup>
                        <ImageDrawing Rect = "300,100,300,180" ImageSource = "Images\DSC_0104.JPG"/>
                        <ImageDrawing Rect = "0,100,250,100" ImageSource = "Images\DSC_0104.JPG"/>
                        <ImageDrawing Rect = "150,0,25,25" ImageSource = "Images\DSC_0104.JPG"/>
                        <ImageDrawing Rect = "0,0,75,75" ImageSource = "Images\DSC_0104.JPG"/>
                     </DrawingGroup>
                  </DrawingImage.Drawing>

               </DrawingImage>
            </Image.Source>
         </Image>

      </Border>
   </Grid>

</Window>
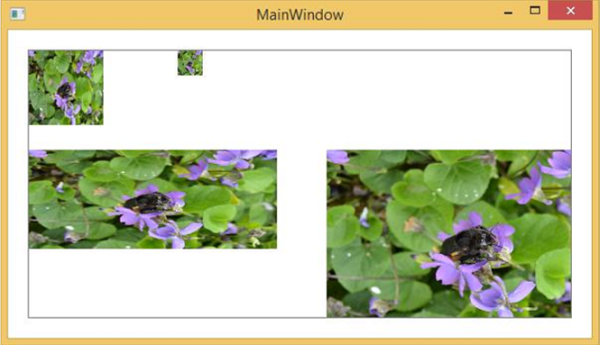
هنگامی که برنامه خود را اجرا می کنید، خروجی زیر را تولید می کند -
مثال
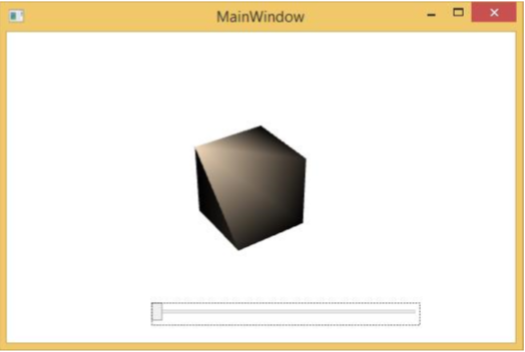
بیایید نگاهی به مثال دیگری که یک شی 3D را نشان می دهد.
کد زیر XAML یک شی 3D و یک نوار لغزنده ایجاد می کند. با استفاده از bar، می توانید این سه بعدی را بچرخانید.
<Window x:Class = "WPF3DGraphics1.MainWindow"
   xmlns = "http://schemas.microsoft.com/winfx/2006/xaml/presentation"
   xmlns:x = "http://schemas.microsoft.com/winfx/2006/xaml"
   xmlns:d = "http://schemas.microsoft.com/expression/blend/2008"
   xmlns:mc = "http://schemas.openxmlformats.org/markup-compatibility/2006"
   xmlns:local = "clr-namespace:WPF3DGraphics1"
   mc:Ignorable = "d" Title = "MainWindow" Height = "350" Width = "525">

   <Grid>
      <Viewport3D Name="viewport3D1">

         <Viewport3D.Camera>
            <PerspectiveCamera x:Name = "camMain" Position = "6 5 4" LookDirection = "-6 -5 -4">
            </PerspectiveCamera>
         </Viewport3D.Camera>

         <ModelVisual3D>
            <ModelVisual3D.Content>
               <DirectionalLight x:Name = "dirLightMain" Direction = "-1,-1,-1">
               </DirectionalLight>
            </ModelVisual3D.Content>
         </ModelVisual3D>

         <ModelVisual3D x:Name = "MyModel">
            <ModelVisual3D.Content>
               <GeometryModel3D>

                  <GeometryModel3D.Geometry>
                     <MeshGeometry3D x:Name = "meshMain"
                        Positions = "0 0 0  1 0 0  0 1 0  1 1 0  0 0 1  1 0 1  0 1 1  0 1 1"
                        TriangleIndices = "2 3 1  3 1 0  7 1 3  7 5 1  6 5 7  6 4 5  6 2 0
                        2 0 4  2 7 3  2 6 7  0 1 5  0 5 4">
                     </MeshGeometry3D>
                  </GeometryModel3D.Geometry>

                  <GeometryModel3D.Material>
                     <DiffuseMaterial x:Name = "matDiffuseMain">
                        <DiffuseMaterial.Brush>
                           <SolidColorBrush Color = "Bisque"/>
                        </DiffuseMaterial.Brush>
                     </DiffuseMaterial>
                  </GeometryModel3D.Material>

               </GeometryModel3D>
            </ModelVisual3D.Content>

            <ModelVisual3D.Transform>
               <RotateTransform3D>
                  <RotateTransform3D.Rotation>
                     <AxisAngleRotation3D x:Name = "rotate" Axis = "1 2 1"/>
                  </RotateTransform3D.Rotation>
               </RotateTransform3D>
            </ModelVisual3D.Transform>

         </ModelVisual3D>
      </Viewport3D>

      <Slider Height = "23" HorizontalAlignment = "Left"
         Margin = "145,271,0,0" Name = "slider1"
         VerticalAlignment = "Top" Width = "269"
         Maximum = "360"
         Value = "{Binding ElementName = rotate, Path=Angle}" />

   </Grid>

</Window>